How to: Enable SSH access on Bluehost Account.

If you hold a web hosting account then i think SSH access to your hosting should be your top priority.Here we will get you through complete procedure of how we enabled it for our hosting (BlueHost). For those who are not aware of what SSH is all about, for them we have provided a brief explanation.

What is SSH ?

SSH(Secure Shell) is a secure and encrypted channel between computer for mainly data flow.Here we need to have a server and client for the communication.

SSH_nethunk7

Why we need SSH?

1.SSH(Secure Shell) as the name says is secure because the data that flows using this protocol is encrypted.
2.Its fast and easy to use.
3.It makes life easier for a webmaster to edit files but need Unix skills indeed.
4.Can also be used for Secure copy (SCP) and Secure File transfer (SFTP) also.

How to enable SSH access on BlueHost Account.

For some security reasons Shell account is not enable by default in your webhost.So,in order to enable SSH the hosting account should be verified.In-order to enable it follow the steps below.

1.Get in touch with the Bluehost Team through phone or Live chat and provide your hosting details for account verification.

2.They will ask for any ID proof/Credit card scanned copy etc for webhost account’s actual owner identification.

3.Once you provide the above information the account will be verified within 1hr you can enable SSH access too.

4.Assuming now the account is verified, login to the cpanel and click on SSH/Shell access icon under security.
SSH_nethunk

5.Now click on “Manage SSH access” and enable SSH from the drop down as shown in the image below.
SSH_nethunk16.Now that the SSH is enabled we need two keys(Public key and Private Key) to setup a successful communication.

7.Click on “Manage SSH key” and then click on generate a key and fill the below form then hit generate.
SSH_nethunk2

Note:Use RSA and key size as 4096 for maximum security and remember the password that was used.

8.Once the public and private key is generated down the private key to local host for the SSH client(Example:Putty) to make a secure connection.Finally SSH access on Bluehost Account is enabled.

How to access files using SSH on BlueHost Account?

We will be using Putty in-order to test  SSH access on a Bluehost Account.Follow the steps below.

1.Download and install Putty.

2.Start Putty and under session fill the host name.
SSH_nethunk3

3.On LHS under SSH->Auth ,browse and select the private key file that was downloaded earlier in the managed keys steps.
SSH_nethunk5

4.Under Connection->Data,give the account username which will be prompted while logging in.
SSH_nethunk4

5.Now go to session section and give a suitable name to save the settings.

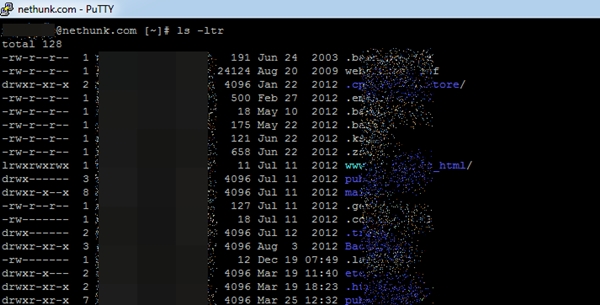
6.Select the saved settings click load and hit open, once the prompt provide the password to authenticate successfully.

SSH_nethunk6

If you have any queries then please comment below.

Why we need to clean Browser Private Data.

We connect to web through browsers.When ever we browse pages few temporary files gets stored in browser cache and login information in cookies.These private data are quiet helpful but at the same time pose a serious threat , below i have listed down few of the unethical consequences one may encounter with these data in there browser.

Browser Private Data_nethunk4_nethunk

  • Cookie hijacking: Suppose u are doing an online transaction or accessed your hosting cpanel and then after visit a low profile site.Then there are chances that your cookie can be used for some unethical purpose.
  • Cache poising: It is mostly related to DNS poisoning but there in this context it is like exploiting your cache and retrieving some valuable information regarding your online presence.
  • Browsing History Monitoring : Some people pile up there web history because it makes  there life easier to visit the website from history and reduce the typing and searching but browsing history is more personal than your personal dairy these days so be careful.. 🙂

So, i would suggest one should set automatically clear the private data on browser exit or do so manually.

How to clean private data of the browser manually.

1.In order to clean the private data of browser manually Press hold Shift+Ctrl+Delete all at a time.

2.A popup appears, select the categories and hit enter then restart the browser to use again.

How to set the browser to clean private data automatically on exit.

Here we will cover the commonly used browsers Mozilla and Google Chrome.

Clear Private data in Mozilla automatically on exit.

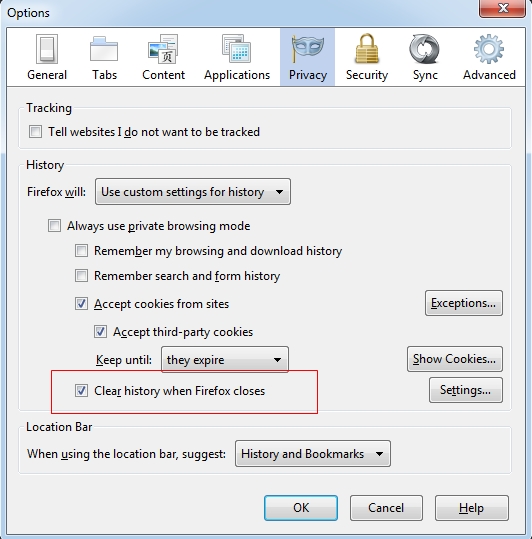
1.Open Mozilla,under options browse to “privacy tab” and select the options as shown in the image below.

Browser Private Data_nethunk

2.Restart the browser to use it.

Clean Private data in Google Chrome automatically on exit.

1.As of now there is no built in functionality in Chrome to auto clean the private data on exit but our purpose can be accomplished using a extension called as “Click&Clean“.

2.After installing the extension click on the small icon to the top right corner in order to open its option for “Click&Clean” as shown in the image below.

Browser Private Data_nethunk2

3.As shown in the image below check the option “Delete private data when chrome closes”.

Browser Private Data_nethunk3

The steps mentioned above can secure your online activities to some extent but we should remember not a single thing is 100% secure 🙂

Authorization and deauthorization of Computer from Apple ID

Authorization and deauthorization are used  for selecting between  the computers that used for connecting to Apple devices.Those computers in which the Apple iTunes is installed are actually authorized using the Apple ID so that, one can sync up all the media files,e-books,apps etc from the connected apple device to the authorized Computers.

ipad-connected-to-macSince Apple has imposed a restriction of authorizing only 5 Computers using a particular Apple ID so, obviously there is a need to de-authorize  few computers which are either obsolete or not owned anymore.Below we will see how to  authorize and de-authorize a Computer.

How to Authorize a Computer using Apple ID ?

1.Log-in to iTunes using a Apple ID.

2.Click on the Authorize This Computer from the store menu drop down on the top menu bar as shown in the image below.

iTunes_netHunk

3. Now a popup appears asking for the Apple ID credentials. So, fill the same and hit Authorize.

iTunes_netHunk1

How to Deauthorize a Computer using Apple ID ?

1.Log-in to iTunes using a Apple ID.

2.Click on the Deauthorize This Computer from the store menu drop down on the top menu bar as shown for authorize.

3. Now a popup appears asking for the Apple ID credentials. So, fill the same and hit Deauthorize.

iTunes_netHunk2

How to Deauthorize all the Computers?

1.Once signed in using the Apple ID browse to the account on clicking account on the top left corner.

2.Here just hit the Deauthorize all button,this button will show up only if the number of authorized computer is 2 or more but less than equal to 5.

iTunes_netHunk3

Manage your computers well for the Apple ID to sync and use features like Home sharing,downloading of purchase apps etc.

Free FTP/SFTP clients for Blogging.

Blogging is a cross platform activity and file transfer is certainly an integral part of it.When the question of file transfer arises then certainly FTP/SFTP clients comes to the scenario.I am sure each and every blogger uses a particular FTP/SFTP client these days to upload there needed bit of file.This complete process looks to be simple but there are few points i have listed below which comes as a deciding factor for the choice of a particular FTP/SFTP client.
Free ftp/sftp clients

  • Security : While file transfer between local host and remote server.
  • Ease of use of the client.
  • Scheduling of transfer of files.
  • Remote file editing feature.
  • Drag and drop functionality etc…much more.

Below i have listed down few of the simple,free yet powerful FTP/SFTP clients for Windows/Linux/Mac OSX.

FTP clients for Mac OS X

1.Filezilla

As mentioned above it is a cross platform client with FTP/SFTP support along with remote file editing and drag and drop feature.

[nggallery id=3]

2.Cyberduck

Cyberduck with an ease to use interface and suports both FTP/SFTP etc.Cloud connectivity and remote file editing feature.Using it one can expand zips and archive tar too.

[nggallery id=10]

3.MacFusion

It is a Mac based FTP/SFTP client,need to have Google’s MacFUSE inorder to use it.

[nggallery id=11]

4.YummyFTP

YummyFTP is one the simple but powerful FTP/SFTP client for Mac OS X with scheduling and directory synchronization along with failure auto recovery feature.

[nggallery id=12]

5.Transmit
It is one of the fastest FTP/SFTP client for Mac OSX along with all the feature that other client could have.

[nggallery id=13]

FTP/SFTP client for Linux.

1.CrossFTP

CrossFTP is a cross platform client but basically used in Linux.It has schedule and on the spot edit feature.Here once can grant the bandwidth limit while transferring files from one host to other.

[nggallery id=8]

2.FileZilla

As you can see i have mentioned this client for all the platforms.It is one of the widely used FTP/SFTP client.

[nggallery id=16]

3.FireFTP

It is cross-platform addon for mozilla and its quite handy as it has browser integration facility and one can right away transfer files to remote host while browsing.

4.gFTP

gFTP is a linux based FTP/FTPs client written in “C”. It has a command based usage.

[nggallery id=9]

FTP/SFTP client for Windows.

1.PSCP and PSFTP

These are the command line interfaces from putty  which makes the file transfer secure and is less time consuming.

[nggallery id=2]

2.WinSCP

WinSCP is free FTP/SFTP client.It is ahead from other ftp client in the fact that it creates two window which makes it easier for the end user to copy files between a local and a remote computer and vice-versa.

[nggallery id=1]

3.Filezilla

Filezilla is one of the most widely used FTP client.Its simple and use friendly.

Features:

  • Remote file editing.
  • IPV6 Support.
  • and drop support and much more.

[nggallery id=3]

4.CoreFTP LE

Core FTP LE is a free FTP/SFTP windows based client with browser integration feature with drag and drop support, file viewing & editing and much more.

[nggallery id=5]

5.BitKinex

BitKinex is unique is the way that it has feature like scheduling for transfer of file from one host to other securely and in less amount of time.

[nggallery id=7]

6.Swish.

Swish is an extension for windows explorer so,it makes possible for windows users to directly transfer file from the system itself using windows explorer instead of using a separate client for SFTP/FTP.

[nggallery id=6]

I am sure many of you must have tried one or the other of the above listed client.Please share your experience with these clients or any any of your favorite client missing from this list.