Category Archives: Mac

How to : Download torrents on iPad without any Apps.
In this tutorial we will see how to download torrents on iPad without using any apps.Downloading torrent is a restriction on iPad without jailbreak but using utorrent and torrent link or magnetic hashes makes this task simple.All this is possible because of remote utorrent configuration option,which detect the client from ipad on entering the computer name.
Note : A computer with utorrent installed and active is needed for this tutorial.

How to : Stream media on iPad free using wireless network
Are you worried about space constraint on your ipad ?Everytime you have to remove media from iPad inorder to load a new one ? 🙂 Do not worry NetHunk has a perfect solution to your worries.Now you can stream media from computer without directly transferring to the iPad. All this is possible with the help of a tool called Air Playit which can stream media on iPad free.Lets see how this tool makes all this hassle simple.

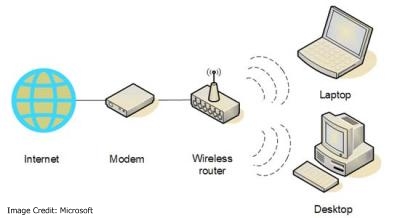
Buying Guide : Wireless router for Home users.
Looking to buy a wireless router for Home and confused with so many options and technical specifications? Do not worry,NetHunk has come up with a new series of buying guides and today in this series we are going to share the guidelines for buying a wireless router,happy huh :).Before going straight away into the guidelines we would like the readers to first sort out their own needs and prerequisites.Here we have listed out few of the deciding factors.
How to: Enable SSH access on Bluehost Account.
If you hold a web hosting account then i think SSH access to your hosting should be your top priority.Here we will get you through complete procedure of how we enabled it for our hosting (BlueHost). For those who are not aware of what SSH is all about, for them we have provided a brief explanation.
What is SSH ?
SSH(Secure Shell) is a secure and encrypted channel between computer for mainly data flow.Here we need to have a server and client for the communication.

Why we need SSH?
1.SSH(Secure Shell) as the name says is secure because the data that flows using this protocol is encrypted.
2.Its fast and easy to use.
3.It makes life easier for a webmaster to edit files but need Unix skills indeed.
4.Can also be used for Secure copy (SCP) and Secure File transfer (SFTP) also.
How to enable SSH access on BlueHost Account.
For some security reasons Shell account is not enable by default in your webhost.So,in order to enable SSH the hosting account should be verified.In-order to enable it follow the steps below.
1.Get in touch with the Bluehost Team through phone or Live chat and provide your hosting details for account verification.
2.They will ask for any ID proof/Credit card scanned copy etc for webhost account’s actual owner identification.
3.Once you provide the above information the account will be verified within 1hr you can enable SSH access too.
4.Assuming now the account is verified, login to the cpanel and click on SSH/Shell access icon under security.

5.Now click on “Manage SSH access” and enable SSH from the drop down as shown in the image below.
 6.Now that the SSH is enabled we need two keys(Public key and Private Key) to setup a successful communication.
7.Click on “Manage SSH key” and then click on generate a key and fill the below form then hit generate.

Note:Use RSA and key size as 4096 for maximum security and remember the password that was used.
8.Once the public and private key is generated down the private key to local host for the SSH client(Example:Putty) to make a secure connection.Finally SSH access on Bluehost Account is enabled.
How to access files using SSH on BlueHost Account?
We will be using Putty in-order to test SSH access on a Bluehost Account.Follow the steps below.
1.Download and install Putty.
2.Start Putty and under session fill the host name.

3.On LHS under SSH->Auth ,browse and select the private key file that was downloaded earlier in the managed keys steps.

4.Under Connection->Data,give the account username which will be prompted while logging in.

5.Now go to session section and give a suitable name to save the settings.
6.Select the saved settings click load and hit open, once the prompt provide the password to authenticate successfully.

If you have any queries then please comment below.
